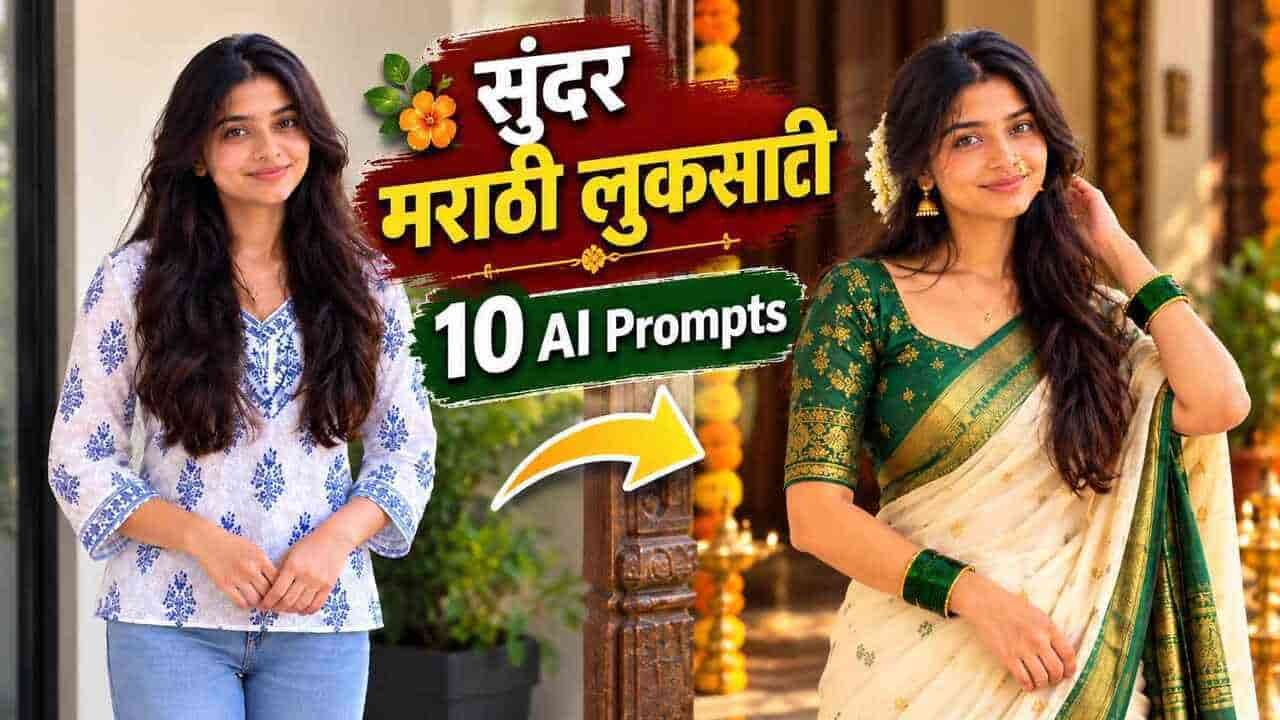
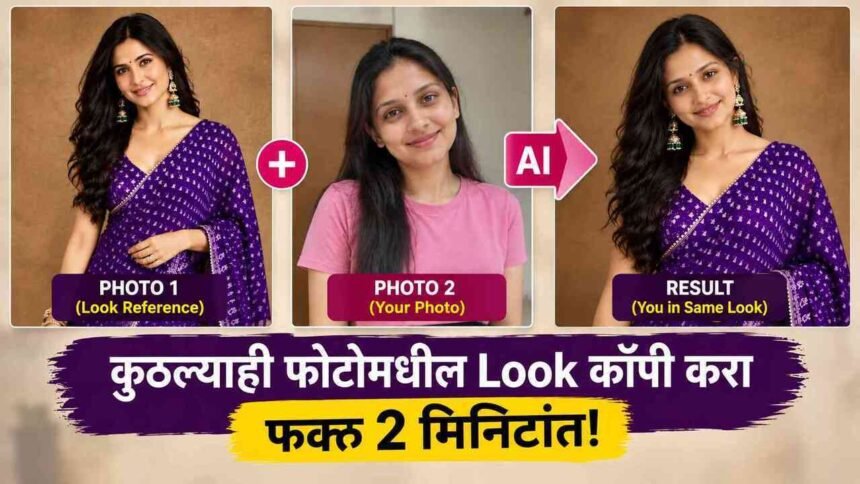
Girls Photo Look Copy Master Ai Prompt: एखादा सुंदर फोटो पाहून तुम्हाला कधी वाटलं आहे का की, “हा लुक माझ्या फोटोमध्ये असता तर किती छान दिसलं असतं?” अनेकदा आपल्याला एखाद्या मुलीच्या किंवा मॉडेलच्या फोटोमधील साडी, हेअरस्टाईल (Hairstyle), ज्वेलरी, पोझ (Pose), बॅकग्राउंड आणि लायटिंग खूप आवडते. पण आपल्याला त्या फोटोतील चेहऱ्याऐवजी स्वतःचा चेहरा आणि स्वतःची ओळख (Identity) ठेवायची असते.
आता हे आधुनिक AI Image Editing च्या मदतीने अगदी काही सेकंदांत करणे शक्य झाले आहे!
📢 एआय संबंधित नवीन आणि उपयोगी माहितीसाठी Ai Shikshan ला Google वर प्राधान्य असलेले स्रोत मध्ये जोडा.
यासाठी तुम्हाला वेगवेगळे प्रॉम्ट्स शोधण्याची अजिबात गरज नाही. फक्त दोन फोटो आणि एक Master 2-Photo AI Prompt वापरून तुम्ही कोणत्याही आवडलेल्या फोटोमधील व्हिज्युअल लुक तुमच्या स्वतःच्या फोटोवर रीक्रिएट (Recreate) करू शकता. हा मास्टर प्रॉम्ट खास महिलांच्या ट्रेडिशनल, साडी, वेडिंग, फेस्टिव्हल, सिनेमॅटिक आणि प्रोफेशनल लुक्ससाठी डिझाइन करण्यात आला आहे.
मुलींसाठी हा Master AI Prompt नेमका काय करतो?
समजा तुम्हाला सोशल मीडियावर एखाद्या सेलिब्रिटीचा किंवा मॉडेलचा Traditional Saree Look आवडला आहे. तिची साडी नेसण्याची पद्धत, ब्लाउज डिझाईन, हेअरस्टाईल, दागिने आणि बॅकग्राउंड तुम्हाला हुबेहूब हवे आहे, पण चेहरा तुमचा हवा आहे.
या मॅजिक ट्रिकसाठी आपण २ फोटो वापरणार आहोत:
- PHOTO 1 (Look / Visual Reference): हा असा फोटो असावा ज्यातील लुक तुम्हाला आवडला आहे आणि जो तुम्हाला कॉपी करायचा आहे.
- PHOTO 2 (तुमचा स्वतःचा फोटो): या फोटोमधून एआय (AI) तुमची फेस आयडेंटिटी (Face Identity) घेईल.
सोप्या भाषेत सांगायचे तर:
- PHOTO 1 = फोटो कसा दिसावा? (Outfit & Style)
- PHOTO 2 = फोटोमध्ये कोण असावे? (Your Face)
या पद्धतीमुळे मॉडेलच्या फोटोचा लुक तुमच्या फोटोवर येतो, पण व्यक्ती म्हणून तुमची मूळ ओळख आणि सौंदर्य अजिबात बदलत नाही.
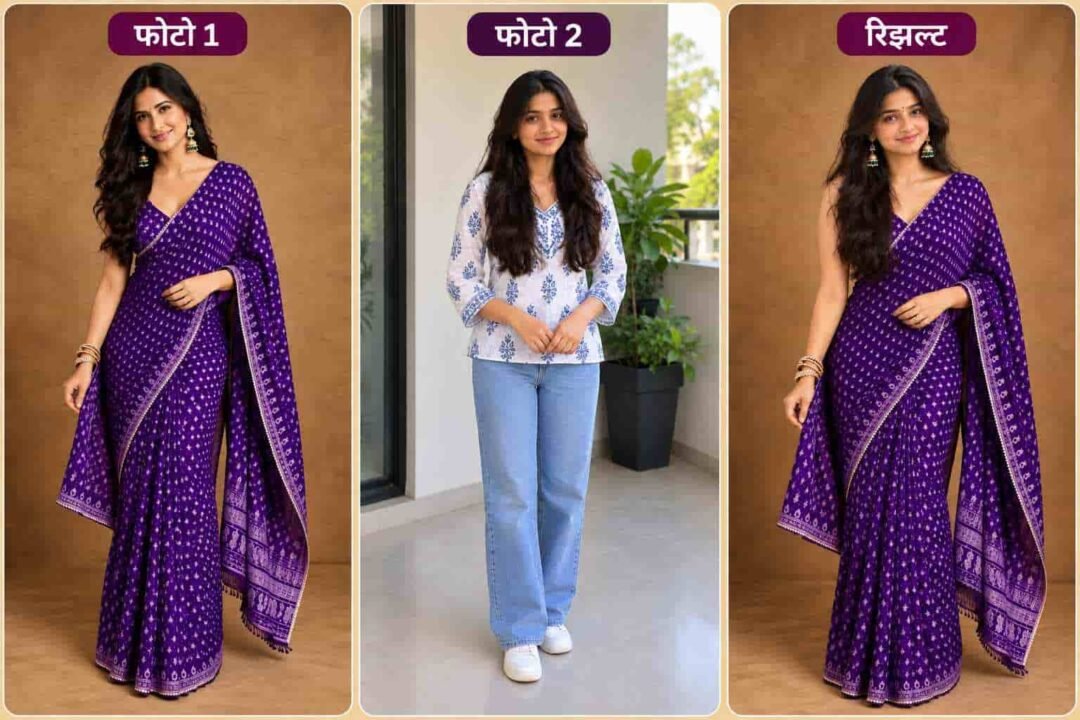
WhatsApp किंवा Facebook DP साठीही अत्यंत उपयोगी
व्हॉट्सॲप किंवा फेसबुकवर दरवेळी नवीन आणि प्रीमियम डीपी (DP) ठेवण्यासाठी महागडे प्रोफेशनल फोटोशूट करणे प्रत्येकालाच शक्य नसते.
तुमच्याकडे घरात काढलेला एखादा साधा पण स्पष्ट फोटो असेल आणि तुम्हाला दुसऱ्या एखाद्या फोटोमधील हेवी एम्ब्रॉयडरी साडी, ट्रॅडिशनल ज्वेलरी आणि सिनेमॅटिक बॅकग्राउंड आवडले असेल, तर या पद्धतीचा वापर करून तुम्ही घरबसल्या तसाच रॉयल लुक मिळवू शकता. हे डिजिटल फोटोशूट केल्यासारखेच वाटते!
१००% लुक कॉपी करण्यासाठी ‘या’ गोष्टी लक्षात ठेवा
तुम्हाला रेफरन्स फोटोमधील लुक अगदी हुबेहूब कॉपी करायचा असेल, तर केवळ तुमचा फोटो स्पष्ट असून चालणार नाही. काही गोष्टींची काळजी घेणे आवश्यक आहे:
- समान पोझ आणि एक्स्प्रेशन: तुमचा स्वतःचा फोटो (PHOTO 2) देखील शक्य तितका रेफरन्स फोटोसारख्या पोझ आणि फेशिअल एक्स्प्रेशन (चेहऱ्यावरील भाव) मध्ये असावा.
- कॅमेरा अँगल: जर मॉडेल कॅमेऱ्याकडे पाहून हलके हसत उभी असेल, तर तुमचा फोटोही कॅमेऱ्याकडे पाहणारा आणि स्मितहास्य असलेला असावा. यामुळे AI ला दोन्ही फोटोंचे कॉम्बिनेशन करणे सोपे जाते.
- महत्त्वाची टीप: एआय इमेज जनरेशनमध्ये प्रत्येक बारीक तपशील १००% अचूक कॉपी होईलच असे नाही. मात्र, फोटो जितके स्पष्ट आणि सारख्या अँगलचे असतील, तितका रिझल्ट अधिक प्रीमियम मिळतो.
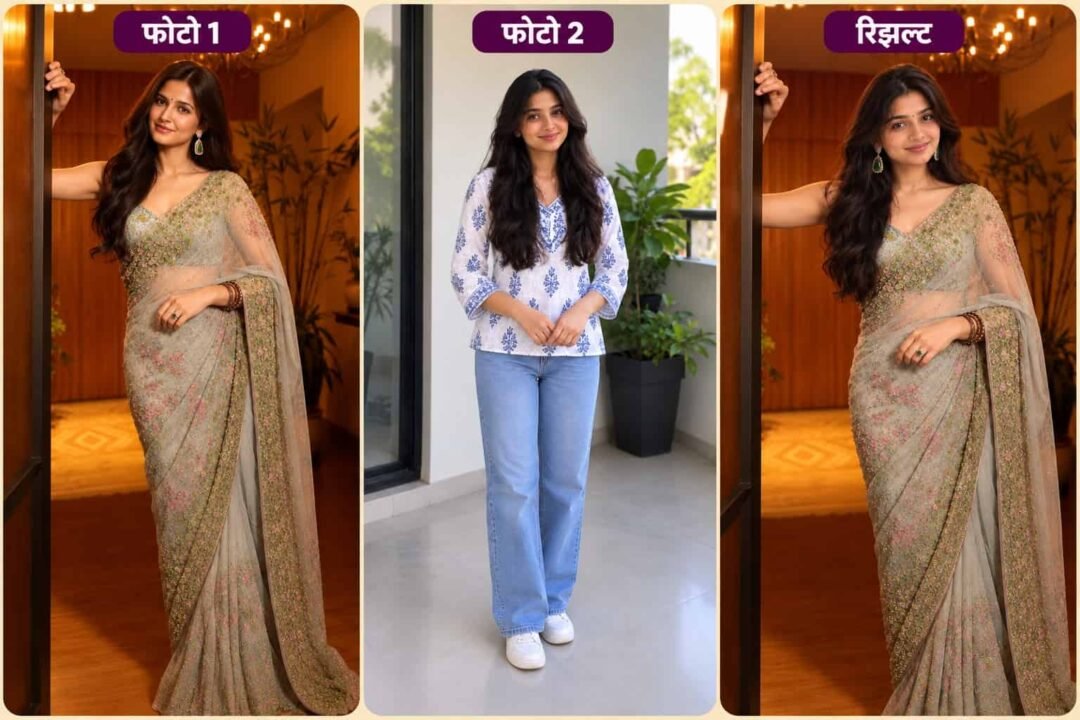
हा Master Prompt कसा काम करतो?
या प्रॉम्टची रचना अशी करण्यात आली आहे की, AI दोन्ही फोटोंमधील गोष्टी स्पष्टपणे वेगळ्या करतो:
- PHOTO 1 कडून काय घेतले जाते: कपडे (Outfit), पोझ, हावभाव, हेअरस्टाईल, दागिने, मेकअप, बॅकग्राउंड, लायटिंग आणि कॅमेरा अँगल.
- PHOTO 2 कडून काय घेतले जाते: चेहऱ्याची ठेवण (Face Structure), डोळे, नाक, ओठ, स्किन टोन आणि तुमची नॅचरल आयडेंटिटी.
प्रॉम्टमध्ये AI ला स्पष्ट सूचना दिली आहे की PHOTO 1 मधील मॉडेलचा चेहरा पूर्णपणे काढून टाकायचा आहे आणि तिथे PHOTO 2 मधील युझरचा चेहरा नॅचरल पद्धतीने सेट करायचा आहे.
प्रॉम्ट वापरण्यासाठी दोन फोटो कसे निवडायचे?
- PHOTO 1 (Look Reference): तुम्हाला ज्या मुलीचा किंवा मॉडेलचा लुक हवा आहे तो फोटो निवडा. फोटोमध्ये आउटफिट आणि बॅकग्राउंड स्पष्ट दिसावे.
- PHOTO 2 (तुमचा स्वतःचा फोटो): तुमचा फोटो हाय-क्वालिटी आणि चेहरा स्पष्ट दिसणारा असावा.
हेही वाचा: Marathi Birthday AI Photo Editing Prompts: फोटो वापरून बनवा 8 खास वाढदिवस शुभेच्छा इमेजेस.
Master AI Prompt वापरण्याची सोपी पद्धत (Step-by-Step)
- Step 1: तुम्हाला आवडलेला मॉडेलचा लुक असलेला फोटो (PHOTO 1) निवडा.
- Step 2: तुमचा स्वतःचा स्पष्ट चेहरा असलेला फोटो (PHOTO 2) निवडा.
- Step 3: हे दोन्ही फोटो ChatGPT मध्ये एकाच वेळी अपलोड करा.
- Step 4: खाली दिलेला पूर्ण इंग्लिश मास्टर प्रॉम्ट कॉपी करा आणि तिथे पेस्ट करा.
- Step 5: ‘Generate’ बटनावर क्लिक करा. अवघ्या काही सेकंदांत तुमचा नवीन रॉयल लुक रेडी होईल!
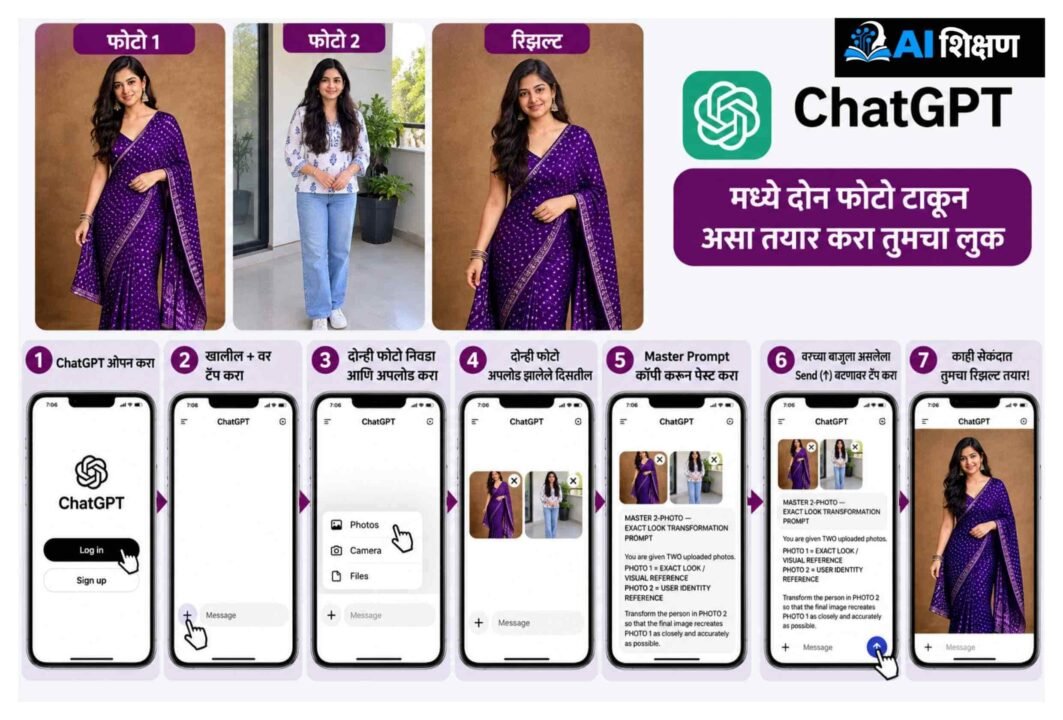
हा प्रॉम्ट वापरा आणि तुमचा आवडता लुक एका मिनिटात रीक्रिएट करून पहा. हा लेख तुमच्या मैत्रिणींसोबत नक्की शेअर करा, जेणेकरून त्याही नवीन सणासुदीचा किंवा ट्रॅडिशनल लुक तयार करू शकतील! एआय विषयावरील अशाच नवनवीन अपडेट्स आणि प्रॉम्ट्ससाठी Ai Shikshan (aishikshan.in) चे WhatsApp Channel फॉलो करा.
खालील मास्टर AI प्रॉम्प्ट कॉपी करा:
MASTER 2-PHOTO — EXACT LOOK TRANSFORMATION PROMPT

You are given TWO uploaded photos.

PHOTO 1 = EXACT LOOK / VISUAL REFERENCE
PHOTO 2 = USER IDENTITY REFERENCE

Transform the person in PHOTO 2 so that the final image recreates PHOTO 1 as closely and accurately as possible.

The final image should look like PHOTO 1 has been recreated using the person from PHOTO 2.

IMPORTANT CORE RULE:

PHOTO 1 determines HOW the final photograph looks.

PHOTO 2 determines WHO the person is.

Therefore:

PHOTO 1 = LOOK
PHOTO 2 = IDENTITY

Transfer the complete visual appearance of PHOTO 1 onto the person from PHOTO 2 while preserving the user's identity.

━━━━━━━━━━━━━━━━━━━━
IDENTITY — ABSOLUTE PRIORITY
━━━━━━━━━━━━━━━━━━━━

The person in the final image MUST remain the same person from PHOTO 2.

Use PHOTO 2 as the ONLY identity reference.

Preserve the user's:

• facial identity
• face shape
• facial structure
• facial proportions
• eyes
• eyebrows
• nose
• lips
• cheeks
• jawline
• chin
• forehead
• ears
• skin tone
• natural skin texture
• distinctive facial characteristics
• age appearance
• recognizable facial features
• natural physical identity

Do NOT use the face of the person in PHOTO 1.

Do NOT face-swap the identity from PHOTO 1.

Do NOT blend the two faces.

Do NOT copy the facial features of PHOTO 1.

Do NOT turn the user into the person shown in PHOTO 1.

The final face must clearly belong to the person from PHOTO 2.

━━━━━━━━━━━━━━━━━━━━
EXACT LOOK TRANSFER
━━━━━━━━━━━━━━━━━━━━

Recreate the visual appearance of PHOTO 1 as accurately as possible.

PHOTO 1 should be treated as the complete visual blueprint for the final photograph.

Copy the following from PHOTO 1 as closely as possible:

• exact outfit concept
• clothing type
• saree/dress style
• saree draping
• blouse design
• blouse color
• saree color
• fabric
• texture
• prints
• embroidery
• borders
• folds
• hairstyle
• hair arrangement
• hair parting
• hair volume
• makeup style
• makeup intensity
• bindi/tikli if visible
• jewellery
• jewellery placement
• accessories
• pose
• posture
• hand position
• arm position
• shoulder position
• head position
• head tilt
• body orientation
• facial expression
• smile
• eye direction
• gaze direction
• camera angle
• camera distance
• framing
• crop
• subject placement
• background
• environment
• décor
• lighting
• shadows
• highlights
• color tone
• depth of field
• background blur
• photographic perspective
• overall mood
• overall visual composition

Do not create a different interpretation of the reference.

Do not merely create a similar style.

Recreate the actual visual look of PHOTO 1 as closely as possible.

━━━━━━━━━━━━━━━━━━━━
POSE — COPY EXACTLY
━━━━━━━━━━━━━━━━━━━━

Copy the pose from PHOTO 1 as closely as possible.

Match:

• standing or sitting position
• body orientation
• shoulder angle
• torso angle
• head angle
• head tilt
• arm position
• elbow position
• wrist position
• hand placement
• finger positioning where visible
• leg position
• foot position where visible
• posture
• weight distribution
• interaction with clothing
• interaction with surroundings

The final person should appear to be performing the SAME pose as the person in PHOTO 1.

Do not invent a new pose.

Do not use a generic pose.

Do not simplify the pose.

Recreate the reference pose as accurately as possible while maintaining physically correct human anatomy.

━━━━━━━━━━━━━━━━━━━━
EXACT FACIAL EXPRESSION
━━━━━━━━━━━━━━━━━━━━

Recreate the facial expression shown in PHOTO 1.

Match:

• smile level
• mouth position
• eye expression
• gaze direction
• eyebrow position
• cheek expression
• head orientation
• overall emotional expression

IMPORTANT:

Copy the EXPRESSION from PHOTO 1,
but preserve the FACE IDENTITY from PHOTO 2.

The expression must look natural on the user's face.

Do not copy the facial identity or facial structure of PHOTO 1.

━━━━━━━━━━━━━━━━━━━━
HAIR — EXACT RECREATION
━━━━━━━━━━━━━━━━━━━━

Recreate the hairstyle of PHOTO 1 as accurately as possible.

Match:

• hairstyle
• hair parting
• hair direction
• curls/waves
• bun/ponytail/braid
• hair volume
• hair placement
• front hair strands
• loose strands
• overall silhouette

Use the user's natural hair characteristics from PHOTO 2 while recreating the hairstyle and arrangement of PHOTO 1.

━━━━━━━━━━━━━━━━━━━━
OUTFIT — EXACT RECREATION
━━━━━━━━━━━━━━━━━━━━

Recreate the clothing from PHOTO 1 as closely as possible.

Match:

• exact garment type
• color
• material
• fabric appearance
• pattern
• print
• embroidery
• border
• zari
• neckline
• sleeves
• blouse design
• draping style
• pleats
• pallu placement
• folds
• fitting
• visible clothing details

The clothing should look as if the person from PHOTO 2 is wearing the exact outfit shown in PHOTO 1.

━━━━━━━━━━━━━━━━━━━━
JEWELLERY — COPY EXACTLY
━━━━━━━━━━━━━━━━━━━━

Recreate the jewellery visible in PHOTO 1.

Match:

• type of jewellery
• number of visible pieces
• size
• shape
• design
• color
• material
• placement
• orientation
• proportion
• overall appearance

Copy the jewellery arrangement from PHOTO 1 as accurately as possible.

Do NOT randomly add jewellery that is not visible in PHOTO 1.

Do NOT remove clearly visible jewellery from PHOTO 1.

Do NOT replace the reference jewellery with generic jewellery.

Do NOT exaggerate the jewellery.

The jewellery should look physically attached to the user's body and naturally integrated with the final photograph.

━━━━━━━━━━━━━━━━━━━━
MAKEUP & ACCESSORIES
━━━━━━━━━━━━━━━━━━━━

Recreate the makeup and visible accessories from PHOTO 1.

Match:

• foundation appearance
• natural skin finish
• blush
• lip color
• eye makeup
• eyeliner
• eyebrow styling
• bindi/tikli
• hair accessories
• other visible styling accessories

Keep the user's actual facial identity unchanged.

Do not over-beautify or redesign the user's face.

━━━━━━━━━━━━━━━━━━━━
BODY & PHYSICAL IDENTITY
━━━━━━━━━━━━━━━━━━━━

The user's physical identity comes from PHOTO 2.

Preserve the user's natural:

• body structure
• body proportions
• build
• shoulder width
• torso proportions
• arm proportions
• leg proportions
• overall physique

However, reproduce the POSE and CLOTHING FIT from PHOTO 1 as accurately as possible.

If PHOTO 1 shows a different body type, do not replace the user's identity with that person's body.

Instead, recreate the same pose, clothing appearance and visual composition naturally on the user's body.

Never create distorted anatomy.

━━━━━━━━━━━━━━━━━━━━
BACKGROUND — EXACT VISUAL MATCH
━━━━━━━━━━━━━━━━━━━━

Recreate the background and environment of PHOTO 1 as closely as possible.

Match:

• location/environment
• architecture
• walls
• doors/windows
• furniture
• plants
• decorations
• props
• decorative objects
• floor
• background elements
• spatial arrangement
• depth
• lighting environment
• background blur

The final background should visually resemble PHOTO 1, not a generic version of it.

━━━━━━━━━━━━━━━━━━━━
LIGHTING & PHOTOGRAPHY
━━━━━━━━━━━━━━━━━━━━

Match the photographic characteristics of PHOTO 1.

Recreate:

• light direction
• light softness
• brightness
• highlights
• shadows
• contrast
• color temperature
• exposure
• depth of field
• background bokeh
• camera perspective
• lens look
• framing
• photographic composition

The final image should look like it was photographed under the same conditions as PHOTO 1.

━━━━━━━━━━━━━━━━━━━━
REALISM
━━━━━━━━━━━━━━━━━━━━

Create a highly realistic professional photograph.

Use:

• realistic skin texture
• realistic pores
• natural facial detail
• realistic hair strands
• realistic fabric
• physically accurate jewellery
• natural shadows
• realistic reflections
• accurate anatomy
• realistic hands and fingers
• natural proportions
• realistic depth of field

The final image must look like a genuine DSLR/mirrorless photograph.

NOT:

• AI illustration
• 3D render
• CGI
• plastic skin
• synthetic face
• excessive beauty filter
• artificial skin
• distorted anatomy
• unrealistic hands
• fake jewellery
• generic AI portrait

━━━━━━━━━━━━━━━━━━━━
REFERENCE PRIORITY
━━━━━━━━━━━━━━━━━━━━

When there is a conflict between the two photos, use this priority:

1. USER'S IDENTITY — PHOTO 2


2. USER'S FACIAL FEATURES — PHOTO 2


3. USER'S NATURAL BODY IDENTITY — PHOTO 2


4. EXACT OUTFIT — PHOTO 1


5. EXACT POSE — PHOTO 1


6. EXACT FACIAL EXPRESSION — PHOTO 1


7. EXACT HAIRSTYLE — PHOTO 1


8. EXACT JEWELLERY — PHOTO 1


9. EXACT MAKEUP & ACCESSORIES — PHOTO 1


10. EXACT BACKGROUND — PHOTO 1


11. EXACT LIGHTING — PHOTO 1


12. EXACT CAMERA ANGLE & COMPOSITION — PHOTO 1


━━━━━━━━━━━━━━━━━━━━
FINAL TRANSFORMATION RULE
━━━━━━━━━━━━━━━━━━━━

Think of the transformation as:

PHOTO 1 provides the COMPLETE VISUAL BLUEPRINT.

PHOTO 2 provides the PERSON.

Recreate PHOTO 1 as closely as possible, but replace the person in PHOTO 1 with the exact person from PHOTO 2.

The final result should look like:

"THE PERSON FROM PHOTO 2, RECREATED IN THE EXACT LOOK, POSE, EXPRESSION, CLOTHING, HAIRSTYLE, JEWELLERY, MAKEUP, BACKGROUND, LIGHTING AND PHOTOGRAPHIC COMPOSITION OF PHOTO 1."

Preserve the user's identity completely.

Transfer the visual appearance of PHOTO 1 as completely as possible.

Do not create a new interpretation.

Do not create a generic version.

Do not mix the identities.

Do not change who the person is.

Make PHOTO 1 the visual blueprint and PHOTO 2 the identity source.